Overview
Press space key to move the main character (Sprite) up and down to dodge the obstacles.
The goal is to be familiar with using Scratch to program, so let’s enjoy it.
To start off, open Scratch Desktop to start a new project.
Once you open Scratch Desktop, select [File > New] on the menu bar on the top to start a new project.
Setup the Main Character
As a first step, select a main character for this game.
In Scratch, each character inside the project is called as "Sprite".
When you start a new project, a Cat Sprite will be set automatically, which you may want to delete by clicking the trash box icon on its top right corner.
You can select and add a Sprite from library when you click the Cat icon (Add Sprite).
Select the one with flying image as in this game the main character flies from left to right.

The First Program

Have you selected a character?
Ok, you are ready to start programming.
In Scratch, you need to set program for each character (Sprite).
Select and drag blocks from the list on the left side of screen (Block Area) and drop them into the center of the screen (Program Area) to make program as below picture.
Blocks stick together when placed closer. Make sure the 3 blocks stays together as a cluster.
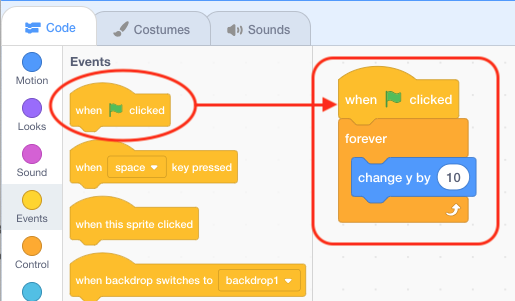
The block with green flag is a trigger of the program.
When the green flag on the top of Game Area is pressed, the program starts from this block.
The next block "forever" initiates repetition. It will keep running the block inside the "forever" block; in this case "change y by 10".
Ok, let's click the green flag to run the program.
What happened on the screen?
If the Sprite moves up in the Game Area, that's perfect!
Control the Sprite with Keyboard
Next, let's make it possible to control the Sprite with keyboard.
Modify the program you have created as the ones below.
It looks a bit complicated but you don't need to worry.
It is simpler than you may think. Let's try it.

How to assembly "if then" block and "key space pressed?" block?
Diamond shape block can be snapped into the diamond shape space.
So bring the light blue block "key space pressed?" and drop it into the diamond space next to the "if".

Once you have completed the program, click the green flag to run the program.
Now the Sprite moves up only when the space key is pressed and it moves down when the space key is released.
Create the Obstacles Sprite
Next step is to add another Sprite to program obstacles.
Use the Paint function to design and draw the obstacles.
The Paint function appears when you move the cursor on the Add Sprite button (Cat icon).
When you open the Add Sprite screen by mistake, just click "Back" to move back.

Once you open the Paint function, click the "Rectangle" button and draw a vertically long rectangle as the picture below.
You can change the color to the one you like.

Moving the Obstacles Sprite

Now, let's make program for the obstacles.
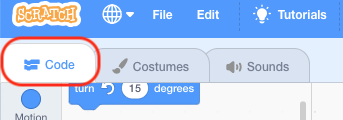
Click the [Code] tab on the top left to switch to coding screen.
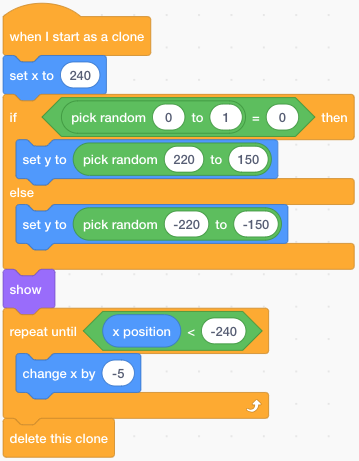
Set the program for the obstacle Sprite as the image below.
Once completed, you are ready to run the program.
Because this program does not start with the green flag block, you can't run it by clicking the green flag.
Instead, click the "when I start as a clone" block to run the program.
Do you see the obstacle moving from right side to the left side?
We still need some modifications though.
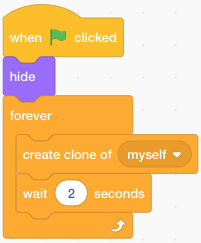
In the real game, obstacles should appear automatically without clicking the block.
In order to realize this, set additional program below for the obstacle Sprite.
After adding the program below, obstacle Sprite will be created on a regular basis (every 2 seconds in this case) once the green flag is clicked.
When the Main Sprite Hits the Obstacle Sprite...

At the moment, nothing happens when the main Sprite hit the obstacles.
To make it work as a game, let's add "game over" function to stop the game when the main Sprite hit the obstacles.
Click the main Sprite and add the program below surrounded by the red line into the existing program as below picture.
Well, you may not find the block "touching Sprite1".
In that case, find the "touching xxx" block and click a small triangle button and select the name "Sprite1".
("Sprite1" is the name of the main Sprite)
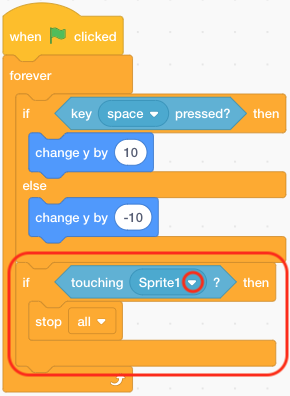
Once you have completed the program above, when the main Sprite hit the obstacles the game (or the program) stops automatically.
Add Scoring Function
In addition, let's add a scoring function.
You will make a program to keep counting up the score on a regular basis as the game goes on.
In programming, "Variable" is used to count numbers or store data.
Scratch also has the "Variable" block to store and modify data.
Let's click "Make a Variable" and create a new variable called "score".

Once create a variable, blocks to set and modify the value into the variable will appear.
Add below program to the main Sprite.
This program realizes the scoring function, which count up score by "1" on a regular basis (in this case, every 1 second).

Set a Backdrop to Complete the Game!
As a last step, let's set the background picture (backdrop).
Click "Backdrop" button on the bottom right and select the one you like.

Wow, you have created the first game!
Good job!!
You may want to modify the program to make it more exciting, such as to change the speed of obstacles or the interval duration of obstacles creation.
